
Are you building a dapp and looking for an easy and reliable web3 developer tooling to add a connect wallet button, support multiple accounts, and push transaction notifications to your users? With Web3 Onboard’s react hook package, any developer can quickly set up their dapp to connect EVM (Ethereum Virtual Machine) compatible wallets, make transactions and sign contracts. Web3 Onboard also allows for a full range of customizations, styling, and theming that makes the process of onboarding users look and feel natural and native in any dapp (Decentralized Application) environment.
In this article, we’ll cover our React hooks most commonly used by Ethereum developers and how you can easily integrate them into your project. We will go over:
- How to add a “connect wallet” button to your dapp
- How to connect multiple wallets and accounts on your dapp
- How to send transactions from your dapp
- How to add real-time transaction notifications to your dapp so users can monitor their transaction through the mempool
- How to add customizable alerts to your dapp
- How to add pre-flight notifications (i.e. waiting for confirmation, insufficient funds, etc) to your dapp
Although this example runs through the Web3 Onboard React package the Web3 Onboard UI and Functionality can be used in any Front End Javascript Framework (React, Next, Angular, Vue, Svelte, etc), Typescript or Vanilla JS application. For more on this, please see the Typescript driven, framework agnostic Core Package or, if you are a Vue developer, checkout the Vue Package.
What is a react hook?
A react hook is a wrapped function that makes accessing API actions simple and clean. With the react hooks we abstract the extra code and complexity in the package and make it simple and clear how to execute API actions.
Accept injected wallets on your dapp
Injected wallets are wallets that connect to users' browsers, such as Metamask or Coinbase Wallet. You will most likely want to add this ability to your dapp. With this module, Injected Wallets are automatically detected on both desktop or within the specified wallet’s mobile app by Web3 Onboard. Full documentation for injected-wallets can be found in our official docs here.
To start accepting injected wallets, let's get started by installing a few packages using yarn or npm.
**NPM**
'npm i @web3-onboard/react @web3-onboard/injected-wallets ethers'

**Yarn**
'yarn add @web3-onboard/react @web3-onboard/injected-wallets ethers'
Initializing Web3 Onboard with React Hooks
Next we will initialize Web3 Onboard using the `init` hook provided by the @web3-onboard/react package. This can be done in a service file or directly in the App.js file of your project.
For this example we will only add the Ethereum Mainnet and Rinkeby Testnet chains but any EVM chain can be added to the chains array (Polygon, BNB - Binance, Fantom, Arbitrum, Optimism, etc.).
To get started we will execute the `injectedModule()` function that we get from @web3-onboard/injected-wallet which will initialize the module and will allow Web3 Onboard to look for injected wallets on page load or button click. If we wanted to expand on the wallets accepted by your dapp web3-onboard supports many hardware and SDK wallets as well which can be added in the same way. See a full list here.
**Note - With injected wallets only wallets that are installed on the browser or used within the specified wallet’s mobile app will be displayed.
Next we will want to head to https://infura.io/ and sign up for a free Infura API key. This will allow us to retrieve balances and make RPC calls.
Full documentation around initializing Web3-Onboard can be found here.
import { init } from '@web3-onboard/react'
import injectedModule from '@web3-onboard/injected-wallets'

const injected = injectedModule()

const infuraKey = ''

// initialize Onboard
init({
 wallets: [injected],
 chains: [
   {
     id: '0x1',
     token: 'ETH',
     label: 'Ethereum',
     rpcUrl: 'https://mainnet.infura.io/v3/${infuraKey}'
   },
   {
     id: '0x4',
     token: 'rETH',
     label: 'Rinkeby',
     rpcUrl: 'https://rinkeby.infura.io/v3/${infuraKey}'
   }
 ]
})
That’s it for initializing! Now let’s connect a wallet!
Create a "connect wallet" button
Now that Web3 Onboard is initialized and set up to look for and connect to injected wallets we can add code to connect wallets and make the wallet’s information available to the dapp. For this we will use the `useConnectWallet()` hook provided by the @web3-onboard/react package.
We will also import React here so we can call and execute the code and allow our dapp to display the Connect Wallet overlay. To do this we will add the `useConnectWallet()` hook to our App function.
**Note - Order matters when accessing these and deconstructing the array!
const [{ wallet, connecting }, connect, disconnect] = useConnectWallet()
This will return an array of state variables along with executable functions(actions) that can be used to interact with the connected wallets. Full documentation around actions and variables provided by the `useConnectWallet` can be found here.
A breakdown of `useConnectWallet` variables and actions can be found below:
wallet // the wallet that has been connected or null if not yet connected
connecting // boolean indicating if connection is in progress
connect // function to call to initiate user to connect wallet
disconnect // function to call with wallet<DisconnectOptions> to disconnect wallet
updateBalances // function to be called with an optional array of wallet addresses connected through Onboard to update balance or empty/no params to update all connected wallets
setWalletModules // function to be called with an array of wallet modules to conditionally allow connection of wallet types i.e. setWalletModules([ledger, trezor, injected])
setPrimaryWallet // function that can set the primary wallet and/or primary account within that wallet. The wallet that is set needs to be passed in for the first parameter and if you would like to set the primary account, if multiple accounts are connected, the address of that account also needs to be passed in
import React from 'react'
import { init, useConnectWallet } from '@web3-onboard/react'
import injectedModule from '@web3-onboard/injected-wallets'

const injected = injectedModule()

const infuraKey = ''

// initialize Onboard
init({
 wallets: [injected],
 chains: [
   {
     id: '0x1',
     token: 'ETH',
     label: 'Ethereum',
     rpcUrl: 'https://mainnet.infura.io/v3/${infuraKey}'
   },
   {
     id: '0x4',
     token: 'rETH',
     label: 'Rinkeby',
     rpcUrl: 'https://rinkeby.infura.io/v3/${infuraKey}'
   }
 ]
})

function App() {
 const [{ wallet, connecting }, connect, disconnect] = useConnectWallet()

 return (
   <div>
     <button
       disabled={connecting}
       onClick={() => (wallet ? disconnect({label: wallet.label}) : connect())}
     >
       {connecting ? 'connecting' : wallet ? 'disconnect' : 'connect'}
     </button>
   </div>
 )
}

export default App
With this code we should have a very simple webpage with a button that looks like this:
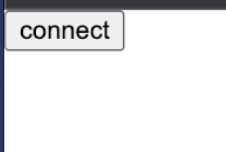
When we hit connect we will see the Onboard modal.
Wait, where are my wallets?!
Add a custom message to your dapp if a user is not using a supported wallet
If no injected wallets are installed on the browser, we will want to let our user know where to go to get a wallet extension. We can do this by adding the `appMetaData` object to the onboard initialization with the `recommendedInjectedWallets` array where we will add wallet installation information for MetaMask and Coinbase for this example.
init({
 wallets: [injected],
 chains: [
   {
     id: '0x1',
     token: 'ETH',
     label: 'Ethereum Mainnet',
     rpcUrl
   }
 ],
 appMetadata: {
   name: 'Blocknative Web3-Onboard',
   icon: blocknativeIcon, // svg string of icon
   logo: blocknativeLogo, // svg string of logo
   description: 'Demo app for Web3-Onboard',
   recommendedInjectedWallets: [
     { name: 'Coinbase', url: 'https://wallet.coinbase.com/' },
     { name: 'MetaMask', url: 'https://metamask.io' }
   ],
   agreement: {
     version: '1.0.0',
     termsUrl: 'https://www.blocknative.com/terms-conditions',
     privacyUrl: 'https://www.blocknative.com/privacy-policy'
   },
   gettingStartedGuide: 'https://blocknative.com', // DApp guide to getting started
   explore: 'https://blocknative.com'
 }
})
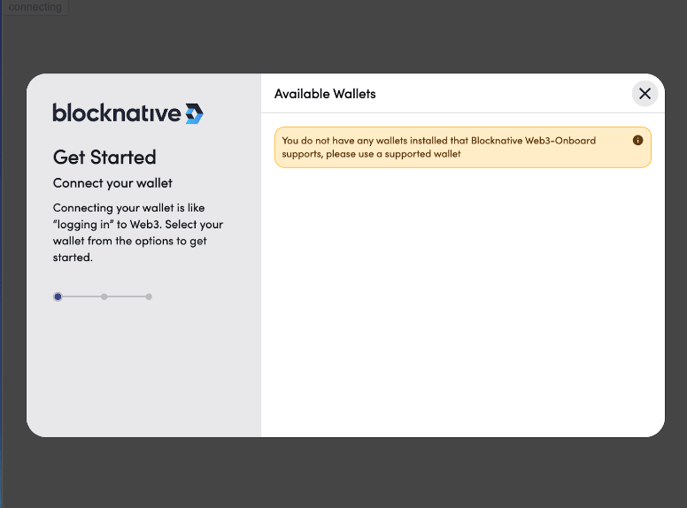
We can also add customized dapp information such as name, description, custom icon & logo, userAgreement, getting started guide, etc. The `appMetadata` property is optional within the initialization object although if you do decide to add the `appMetaData` property some of the inner properties are required.
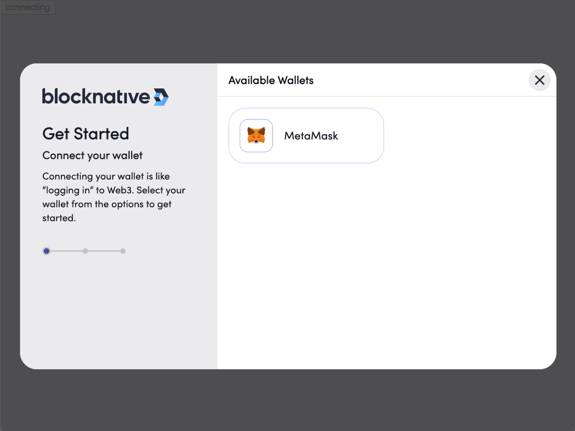
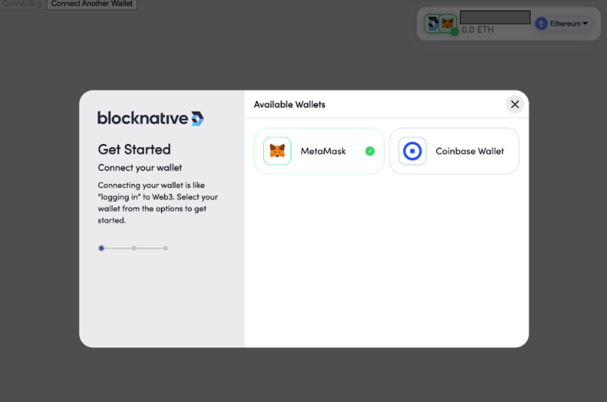
This allows you to customize the Onboarding experience to fit the look and feel of your dapp. After updating the initialization options and clicking `connect` you will have an Onboard overlay that looks like this:
Verify it works by connecting a wallet
To verify that your dapp is able to connect to the injected wallet we will need to add a wallet extension to our browser. For this example, I will use the MetaMask browser extension. After adding the wallet extension to the browser and clicking Connect we will see the following:
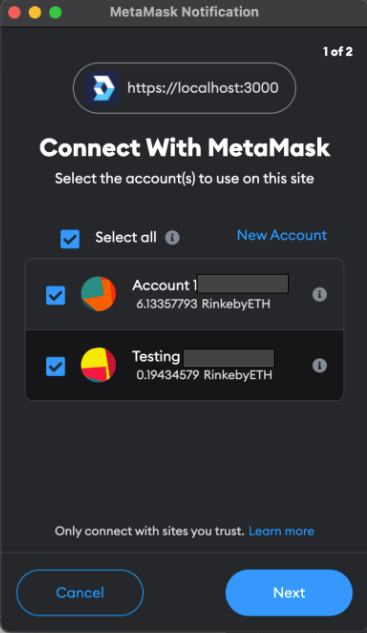
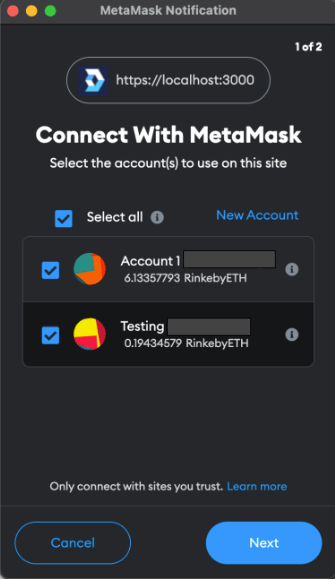
After clicking the MetaMask button we will be asked by the wallet if we can connect to the dapp, which we will confirm.
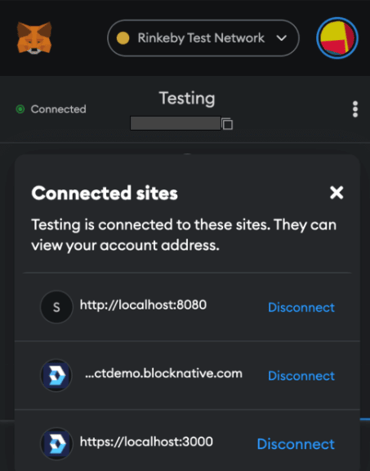
**Note - Web3 Onboard allows users to connect multiple accounts from multiple wallets. At this step the user must select all accounts they want to connect through the “Connect With MetaMask” confirmation. There is no programmatic way to change the selection after a user has connected aside from the user manually revoking site access from the connected sites through the wallet and re-connecting to the application.

After confirming the selected accounts in the wallet we will see:
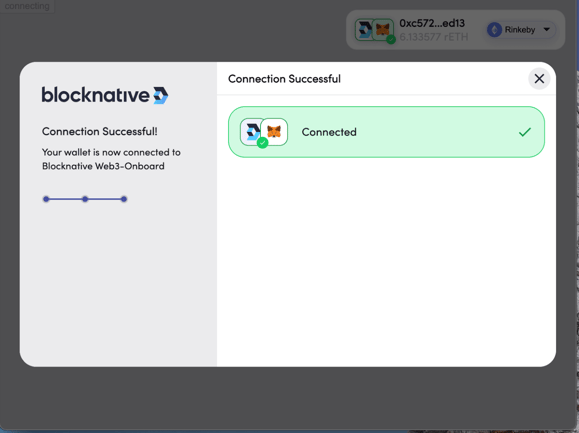
And then, boom! We have a wallet connected!

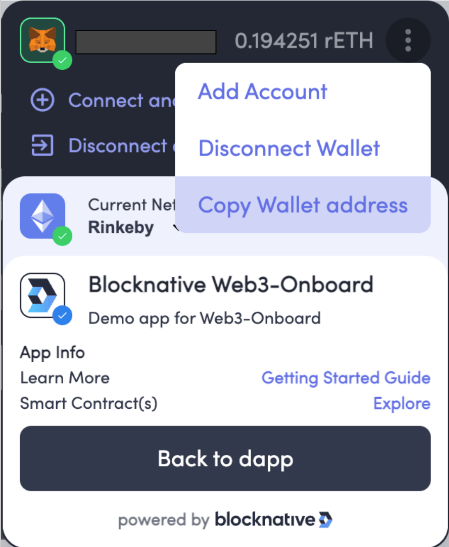
In the upper corner of your dapp you will see the Web3 Onboard Account Center component. This is enabled by default and gives the user more information on and ways to interact with their connected wallets. Upon clicking the Account Center you will see an expanded Account Center view with options to change chains, connect another wallet, disconnect all wallets and more dapp info. Learn more about the Account Center.
Connect multiple wallets to your dapp
Now that we have connected a wallet, we can make it easy for users to connect a second wallet.
To do this let's add the `useWallet()` hook imported from the @web3-onboard/react package and initialize within the App component.
Let's also update the code to conditionally render a new button if a wallet is already connected and include some logging to give further insight into the wallet hooks.
For this example I have added the Coinbase extension to the browser as well.
import React, { useEffect } from 'react'
import { init, useConnectWallet, useWallet } from '@web3-onboard/react'
import injectedModule from '@web3-onboard/injected-wallets'

const injected = injectedModule()

const infuraKey = ''

// initialize Onboard
init({
 wallets: [injected],
 chains: [
   {
     id: '0x1',
     token: 'ETH',
     label: 'Ethereum',
     rpcUrl: 'https://mainnet.infura.io/v3/${infuraKey}'
   },
   {
     id: '0x4',
     token: 'rETH',
     label: 'Rinkeby',
     rpcUrl: 'https://rinkeby.infura.io/v3/${infuraKey}'
   }
 ]
})

function App() {
 const [{ wallet, connecting }, connect, disconnect] = useConnectWallet()

 useEffect(() => {
   if (!connectedWallets.length || !wallet) return
   console.log('connectedWallets: ', connectedWallets)
   console.log('primary wallet', wallet)

 }, [connectedWallets, wallet])


 return (
   <div>
     <button
       disabled={connecting}
       onClick={() => (wallet ? disconnect({label: wallet.label}) : connect())}
     >
       {connecting ? 'Connecting' : wallet ? 'Disconnect' : 'Connect'}
     </button>
     {wallet && (
       <button
         onClick={() => {
           connect()
         }}
       >
         Connect Another Wallet
       </button>
     )}
   </div>
 )
}

export default App
With these changes we will see our original view but, once connected, will have a new button on our dapp to connect another wallet.

By clicking “Connect Another Wallet” we can then select Coinbase:
With our terminal printing:
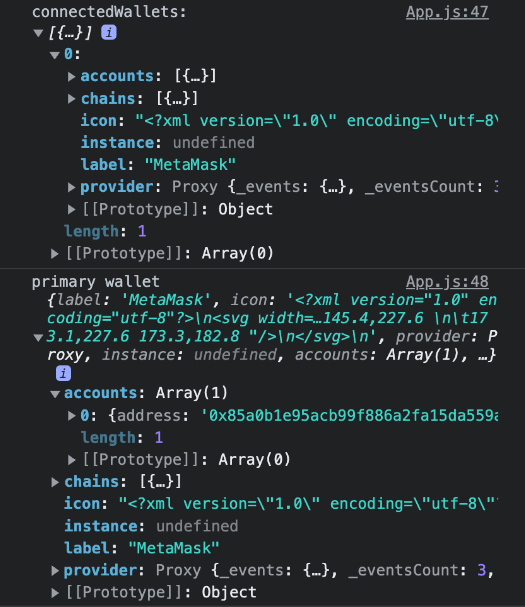
Upon selecting Coinbase we will see the Account Center update and display Coinbase, as the most recently connected wallet becomes the Primary Wallet. This is also reflected by the wallet hook variable.
**Note - If we had two MetaMask accounts we could also connect both accounts although the trick here is they would have to be approved on the initial “Connect With MetaMask” confirmation.
We now have two wallets connected to our dapp!

With the terminal now printing:

Notice how the ConnectedWallets array now has both wallets but the primary or most recently selected (Coinbase) wallet is first.
Also note the `wallet` variable we logged out, marked by the “primary wallet” log reflects this as well. This is the wallet we will focus on for making a transaction in the next step.
Execute transactions on your dapp
This is a big step so bear with me!
First we will import the `useSetChains()` hook from the @web3-onboard/react package along with ethers from the ethers.js lib (ethers lib documentation). Ethers.js is a lightweight alternative to Web3.js and will allow us to create a new Ethereum (EVM chain) provider to execute transactions.
Then we will initialize within the App component:
const [{ chains, connectedChain, settingChain }, setChain] = useSetChain()
`useSetChains()` allows access to the following functionality:
{
   chains, // the list of chains that web3-onboard was initialized with
   connectedChain, // the current chain the user's wallet is connected to
   settingChain // boolean indicating if the chain is in the process of being set
 },
 setChain // function to call to initiate user to switch chains in their wallet
For this example we'll be using the `setChain` function to ensure the user is on Rinkeby Testnet (‘0x4’).
**Note - The chain ID can be a hex encoded string or number. Chain IDs and information can be found at https://chainlist.org/
We will need to create a provider variable and then set that variable if it has not yet been set once the wallet hook exists using React’s `useEffect` hook.
 useEffect(() => {
   if (!wallet?.provider) {
     provider = null
   } else {
     provider = new ethers.providers.Web3Provider(wallet.provider, 'any')
   }
 }, [wallet])
We will then need two functions to transact using the newly created provider:
1.`readyToTransact()` ensures a wallet is connected and we are on the proper chain:
const readyToTransact = async () => {
   if (!wallet) {
     const walletSelected = await connect()
     if (!walletSelected) return false
   }

   if (connectedChain && connectedChain.id === '0x4') {
     // prompt user to switch to Rinkeby for test
     await setChain({ chainId: '0x4' })
   }

   return true
 }
2.`sendTransaction()` ensures we have a recipient address, creates a signer and sends the transaction
const sendTransaction = async () => {
   if (!toAddress) {
     alert('An Ethereum address to send Eth to is required.')
     return
   }

   const signer = provider.getUncheckedSigner()

   await signer.sendTransaction({
     to: toAddress,
     value: 100000000000000
   })
 }
Finally we need to add a react state variable to set the `toAddress` along with creating a text input and button to execute it all.
This gives us the final code seen below:
import React, { useState, useEffect } from 'react'
import { ethers } from 'ethers'
import {
 init,
 useConnectWallet,
 useSetChain,
 useWallets
} from '@web3-onboard/react'
import injectedModule from '@web3-onboard/injected-wallets'

const injected = injectedModule()

const infuraKey = ''

// initialize Onboard
init({
 wallets: [injected],
 chains: [
   {
     id: '0x1',
     token: 'ETH',
     label: 'Ethereum',
     rpcUrl: 'https://mainnet.infura.io/v3/${infuraKey}'
   },
   {
     id: '0x4',
     token: 'rETH',
     label: 'Rinkeby',
     rpcUrl: 'https://rinkeby.infura.io/v3/${infuraKey}'
   }
 ]
})

let provider

function App() {
 const [{ wallet, connecting }, connect, disconnect] = useConnectWallet()
 const connectedWallets = useWallets()
 const [{ chains, connectedChain, settingChain }, setChain] = useSetChain()
 const [toAddress, setToAddress] = useState('')

 useEffect(() => {
   if (!wallet?.provider) {
     provider = null
   } else {
     provider = new ethers.providers.Web3Provider(wallet.provider, 'any')
   }
 }, [wallet])

 const readyToTransact = async () => {
   if (!wallet) {
     const walletSelected = await connect()
     if (!walletSelected) return false
   }

   if (connectedChain && connectedChain.id === '0x4') {
     // prompt user to switch to Rinkeby for test
     await setChain({ chainId: '0x4' })
   }

   return true
 }

 const sendTransaction = async () => {
   if (!toAddress) {
     alert('An Ethereum address to send Eth to is required.')
     return
   }

   const signer = provider.getUncheckedSigner()

   await signer.sendTransaction({
     to: toAddress,
     value: 100000000000000
   })
 }

 return (
   <div>
     <button
       disabled={connecting}
       onClick={() =>
         wallet ? disconnect({ label: wallet.label }) : connect()
       }
     >
       {connecting ? 'Connecting' : wallet ? 'Disconnect' : 'Connect'}
     </button>
     {wallet && (
       <button
         onClick={() => {
           connect()
         }}
       >
         Connect Another Wallet
       </button>
     )}
     {wallet && (
       <div>
         <label>Send 0.0001 Rinkeby Eth to:</label>
         <input type="text" value="{toAddress}"
         placeholder="address"
         onChange={e => setToAddress(e.target.value)}
         />
         <div>
           <button
             onClick={async () => {
               const ready = await readyToTransact()
               if (!ready) return
               sendTransaction()
             }}
           >
             Send
           </button>
         </div>
       </div>
     )}
   </div>
 )
}

export default App
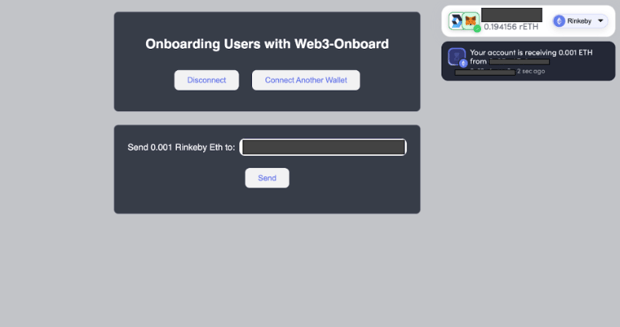
With a little styling the final rendered UI can look something like this:
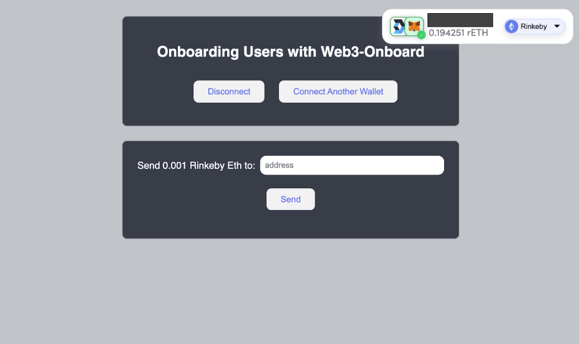
Now you can either copy an address from a second wallet or account or you can use the currently connected account using the Account Center (Click to expand, select menu in the address row - 3 vertical dots, and select “Copy Wallet Address”).
Paste the address in the address field and click send. You will be prompted by your wallet to confirm with the gas price included and then your transaction is sent!
If you have included a Blocknative API key (get one for free here) in your initialization, Transaction Notifications will be turned on by default and the user will be updated on the transaction process every step of the way.
Add transaction notifications on your dapp
Full documentation around Web3-Onboards notifications can be found here
Transaction UX in the blockchain/crypto space is highly challenging for user’s to say the least. With large values passed through seemingly invisible transactions it can be stressful for a user to know what happens after they click confirm in their wallet and even more challenging to onboard new-to-crypto users, until now. With Blocknative’s infrastructure we allow dapp developers to update user’s on the status of their transaction every step of the way.
Now that we have a dapp setup with Blocknative’s Web3 Onboard React Hooks package for Ethereum and EVM Chains (Polygon, Arbitrum, Optimism, etc) we will look into enabling transaction notifications.
Web3 Onboard comes with a bevy of notification options right out of the box all of which can be customized using the React Hooks package.
First let’s look at getting setup with Transaction Notifications.
Initializing Notifications
To initialize notifications all a developer has to do is add their `apiKey` to the Onboard Initialization object. Blocknative API keys are completely free to use. If you don’t already have an API key, you can get one by signing up for a free Blocknative account at https://explorer.blocknative.com/?signup=true.
Let’s look at our initialization with that API key added:
init({
 wallets: [injected],
 chains: [
   {
     id: '0x1',
     token: 'ETH',
     label: 'Ethereum',
     rpcUrl: 'https://mainnet.infura.io/v3/${infuraKey}'
   },
   {
     id: '0x4',
     token: 'rETH',
     label: 'Rinkeby',
     rpcUrl: 'https://rinkeby.infura.io/v3/${infuraKey}'
   }
 ],
 apiKey: 'xxxxxx-bf21-42ec-a093-9d37e426xxxx'
})
That's it!
You are now set up to receive free Transaction Notifications on any transactions on all supported chains.
Let’s take a look at how these are displayed in our UI:
First a “pending” message is displayed that will tell the user how much of what token went to which address. This notification will also include a transaction hash (a link can be added here to link the user to Etherscan for that specific transaction) and elapsed time.
Once the transaction is confirmed a successful confirmation notification will be sent.

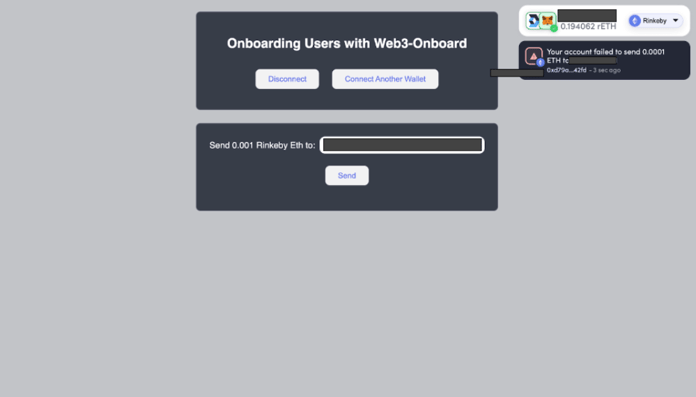
If an error were to arise along the transaction path, the user would also receive a notification of the specific error.
Pretty cool right?
Users finally get updates in a human-readable format on what is happening to their transaction throughout its lifecycle.
That’s what developers get right out of the box by just adding a free Blocknative API key!
Many more notification customizations can be achieved through the notify configuration properties within the onboard initialization object.
This includes positioning, enable/disable, adding links and setting the transaction handler - the powerhouse of the notification customizations. The transaction handler is a function that can modify any transaction based on the Ethereum event properties and return a notification object based on those specifications.
- `Notification.message` - completely customize the message shown
- `Notification.eventCode` - handle codes in your own way - see codes here under the notify prop [default en file here](src/i18n/en.json)
- `Notification.type` - icon type displayed (see `NotificationType` below for options)
- `Notification.autoDismiss` - time (in ms) after which the notification will be dismissed. If set to `0` the notification will remain on screen until the user dismisses the notification, refreshes the page or navigates away from the site with the notifications
- `Notification.link` - add link to the transaction hash. For instance, a link to the transaction on etherscan
- `Notification.onClick()` - onClick handler for when user clicks the notification element
An example of this in our sample onboard initialization could look like this:
init({
 wallets: [injected],
 chains: [
   {
     id: '0x1',
     token: 'ETH',
     label: 'Ethereum',
     rpcUrl: 'https://mainnet.infura.io/v3/${infuraKey}'
   },
   {
     id: '0x4',
     token: 'rETH',
     label: 'Rinkeby',
     rpcUrl: 'https://rinkeby.infura.io/v3/${infuraKey}'
   }
 ],
 apiKey: 'xxxxxx-bf21-42ec-a093-9d37e426xxxx'
 notify: {
   enabled: true,
   position: 'topRight',
   transactionHandler: transaction => {
     console.log({ transaction })
     if (transaction.eventCode === 'txPool') {
       return {
         // autoDismiss set to zero will persist the notification
         // until the user excuses it
         autoDismiss: 0,
         // message: `Your transaction is in the pool,
         // hope you brought a towel`,
         // or you could use onClick
         // for when someone clicks on the notification itself
         onClick: () =>
           window.open('https://rinkeby.etherscan.io/tx/${transaction.hash}')
       }
     }
   }
 }
})
Notify can also be styled by using the CSS variables found below. These are setup to allow maximum customization with base styling variables setting the global theme (i.e. `--onboard-grey-600`) along with more precise component level styling variables available (`--notify-onboard-grey-600`) with the latter taking precedence if defined.
This `notify` initialization can also be split into `desktop` and `mobile` properties for more refined customizing of notifications depending on the device.
notify: {
   desktop: {
     enabled: true,
     position: 'topRight',
     transactionHandler: transaction => {
       console.log({ transaction })
       if (transaction.eventCode === 'txPool') {
         return {
           autoDismiss: 5000,
           // message: 'Your transaction is in the pool, hope you brought a towel',
           // or you could use onClick for when someone clicks on the notification itself
           onClick: () =>
             window.open('https://rinkeby.etherscan.io/tx/${transaction.hash}')
         }
       }
     }
   },
   mobile: {
     enabled: true,
     position: 'bottomRight', // mobile defaults to top and bottom
     // so the left/right is ignored in this case
     transactionHandler: transaction => {
       console.log({ transaction })
       if (transaction.eventCode === 'txPool') {
         return {
           autoDismiss: 0,
           message: 'Your transaction message on mobile',
       }
     }
   }
 }
Further improve your dapp UX
with our useNotifications() React Hook
Full documentation on this set of react hooks for ethereum and EVM developers can be found https://onboard.blocknative.com/docs/modules/react#usenotifications
Alright let's get into some react hooks now!
In this section I’ll walk you through adding customizable alerts and pre-flight notifications to your dapp for a better user experience.
To initialize the Notifications hook we will import `useNotifications()` hook from @web3-onboard/react and initialize in our App component as:
const [
notifications, // the list of all notifications that update when notifications are added, updated or removed
customNotifications, // a function that takes a customNotification object and allows custom notifications to be shown to the user, returns an update and dismiss callback
updateNotify, // a function that takes a Notify object to allow updating of the properties
preflightNotifications, // a function that takes a PreflightNotificationsOption to create preflight notifications
] = useNotifications()
Now we will add some of these to our code to see what they are all about! We'll start with `notifications` which returns the notifications array for use elsewhere in the dapp. This we will log out just for clarity into what's happening.
**Note - To wrap the previous section we have added component styles to make this demo more easy on the eyes. For the full demo app including styling please check out https://github.com/blocknative/react-demo.
import React, { useState, useEffect } from 'react'
import { ethers } from 'ethers'
import {
 useConnectWallet,
 useNotifications,
 useSetChain,
 useWallets,
 init
} from '@web3-onboard/react'
import injectedModule from '@web3-onboard/injected-wallets'
import './App.css'
import blocknativeLogo from './icons/blocknative-logo'
import blocknativeIcon from './icons/blocknative-icon'

const injected = injectedModule()

const infuraKey = 'cea9deb6467748b0b81b920b005c10c1'

const dappId = 'xxxxxx-bf21-42ec-a093-9d37e426xxxx'

const initWeb3Onboard = init({
 wallets: [
   injected
 ],
 chains: [
   {
     id: '0x1',
     token: 'ETH',
     label: 'Ethereum',
     rpcUrl: 'https://mainnet.infura.io/v3/${infuraKey}'
   },
   {
     id: '0x4',
     token: 'rETH',
     label: 'Rinkeby',
     rpcUrl: 'https://rinkeby.infura.io/v3/${infuraKey}'
   },
 ],
 apiKey: dappId,
 notify: {
   enabled: true,
   position: 'topRight',
   transactionHandler: transaction => {
     console.log({ transaction })
     if (transaction.eventCode === 'txPool') {
       return {
         // autoDismiss set to zero will persist the notification until the user excuses it
         autoDismiss: 0,
         // message: 'Your transaction is pending, click here for more info.',
         // or you could use onClick for when someone clicks on the notification itself
         onClick: () =>
           window.open('https://rinkeby.etherscan.io/tx/${transaction.hash}')
       }
     }
   }
 },
 appMetadata: {
   name: 'Blocknative Web3-Onboard',
   icon: blocknativeIcon,
   logo: blocknativeLogo,
   description: 'Demo app for Web3-Onboard',
 },
})

let provider

const App = () => {
 const [
   { wallet, connecting },
   connect,
   disconnect
 ] = useConnectWallet()
 const [{ chains, connectedChain, settingChain }, setChain] = useSetChain()
 const [notifications, customNotification, updateNotify] = useNotifications()
 const connectedWallets = useWallets()

 const [web3Onboard, setWeb3Onboard] = useState(null)

 const [toAddress, setToAddress] = useState('')
 const [notifyPosition, setNotifyPosition] = useState('bottomRight')

 useEffect(() => {
   setWeb3Onboard(initWeb3Onboard)
 }, [])

 useEffect(() => {
   console.log(notifications)
 }, [notifications])

 useEffect(() => {
   if (!connectedWallets.length || !wallet) return
   console.log(connectedWallets)
   console.log(wallet)
 }, [connectedWallets, wallet])

 useEffect(() => {
   if (!wallet?.provider) {
     provider = null
   } else {
     provider = new ethers.providers.Web3Provider(wallet.provider, 'any')
   }
 }, [wallet])

 const readyToTransact = async () => {
   if (!wallet) {
     const walletSelected = await connect()
     if (!walletSelected) return false
   }
   // prompt user to switch to Rinkeby for test
   await setChain({ chainId: '0x4' })

   return true
 }

 const sendHash = async () => {
   if (!toAddress) {
     alert('An Ethereum address to send Eth to is required.')
     return
   }

   const signer = provider.getUncheckedSigner()

   await signer.sendTransaction({
     to: toAddress,
     value: 1000000000000000
   })
 }

 if (!web3Onboard) return <div>Loading...</div>

 return (
   <main>
     <section className="main">
       <div className="main-content">
         <div className="vertical-main-container">
           <div className="container onboard">
             <h2>Onboarding Users with Web3-Onboard</h2>
             <div className="account-center-actions">
               <div>
                 <button
                   className="bn-demo-button"
                   disabled={connecting}
                   onClick={() =>
                     wallet ? disconnect({ label: wallet.label }) : connect()
                   }
                 >
                   {connecting
                     ? 'Connecting'
                     : wallet
                     ? 'Disconnect'
                     : 'Connect'}
                 </button>

                 {wallet && (
                   <button
                     className="bn-demo-button"
                     onClick={() => {
                       connect()
                     }}
                   >
                     Connect Another Wallet
                   </button>
                 )}
               </div>
             </div>
           </div>
           <div className="container notify">
             <div
               style=
             >
               <div style=>
                 <label>Send 0.001 Rinkeby Eth to: </label>
                 <input
                   type="text"
                   style=
                   value={toAddress}
                   placeholder="address"
                   onChange={e => setToAddress(e.target.value)}
                 />
               </div>
               <div className={'send-transaction-container'}>
                 <button
                   className="bn-demo-button"
                   onClick={async () => {
                     const ready = await readyToTransact()
                     if (!ready) return
                     sendHash()
                   }}
                 >
                   Send
                 </button>
               </div>
             </div>
           </div>
         </div>
       </div>
     </section>
   </main>
 )
}
export default App
With those new code chunks, after sending a transaction on rinkeby we can see the following in our console.
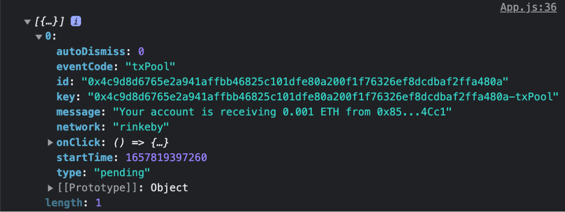
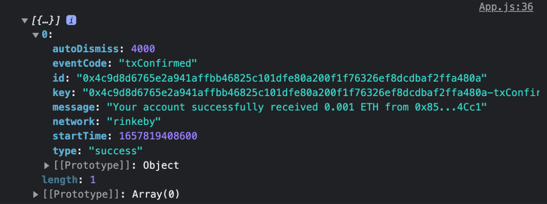
1. First the `notification` array with a single notification:
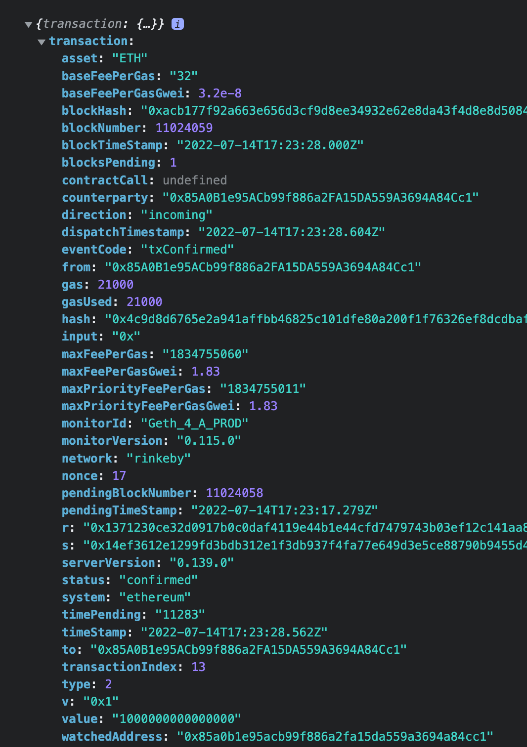
2. Then we see the console.log from the transaction handler displaying the full, decoded ethereum transaction data from which we can customize our notifications:
3. Finally we see the success notification in the `notification` array with message details:
Add custom notifications to your dapp
Next let’s dig into one of my favorites, the `customNotification` function returned by `useNotifications()` React hook. With this Ethereum React hook developers can send styled and slick looking notifications to their users at any time.
When executing the `customNotification` function two methods are returned, `dismiss` and `update`. Calling `dismiss` will remove the notification and calling `update` the notification can be updated with a new notification on any application trigger.
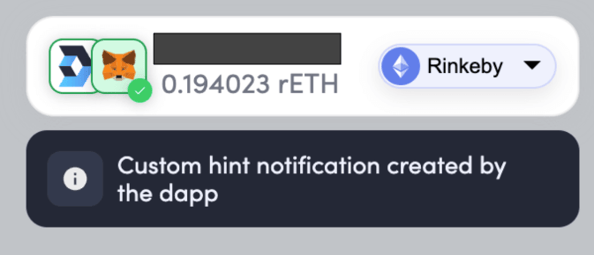
Let’s add a button to send a custom hint notification to the sample Ethereum React hooks demo we have going and check it out in action.
<button
className="bn-demo-button"
onClick={() => {
const { update, dismiss } = customNotification({
eventCode: 'dbUpdate',
type: 'hint',
message:
'Custom hint notification created by the dapp',
onClick: () =>
window.open('https://www.blocknative.com')
})
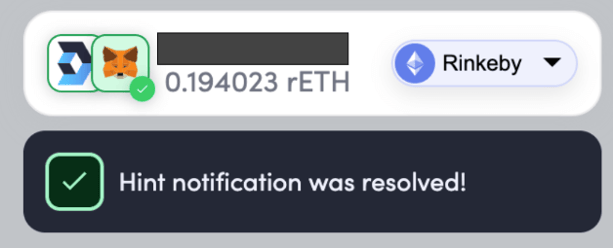
// Update your notification example below
setTimeout(
() =>
update({
eventCode: 'dbUpdateSuccess',
message: 'Hint notification was resolved!',
type: 'success',
autoDismiss: 6000 // 6 seconds
}),
4000
)
setTimeout(
() =>
// use the dismiss method returned or add an autoDismiss prop to the notification
dismiss(),
10000
)
}}
>
Custom Hint Notification
</button>
First you can see we are calling the `customNotification` function with a CustomNotification object (TypeScript object and all TS types are exported for the TypeScript developers out there!), which will create a notification on the UI with the properties set. This ends up producing a custom notification that looks like this:
Now we can perform updates on the notification using the returned methods. In the onClick within our button code you can see we have a couple of `setTimeout` functions, one with 4 seconds and the other with 10. These are to simulate dapp driven actions.
The first setTimeout will call the `update` function after 4 seconds and this takes as a param a CustomNotification object and updates the previously shown notification, in this case, to a success notification. After 10 seconds the `dismiss` function is called which clears the notification.
How to further customize notifications on your dapp
Now let’s checkout the `updateNotify` function returned from the `UseNotifications` React hook.
This function allows devs to customize the setting of the Notifications component, this includes enabled/disabled, position and the transaction handler. This function takes a `Partial <Notify>` object which is the Notify initialization object that you can include any property optionally. This is the same approach used for positioning the AccountCenter as well.
updateNotify({ position: 'topRight' })
We will add this to our demo app to allow movement of the notification container to either corner.
**Note - If you want to refine positioning even further css variables are exposed to further define positioning
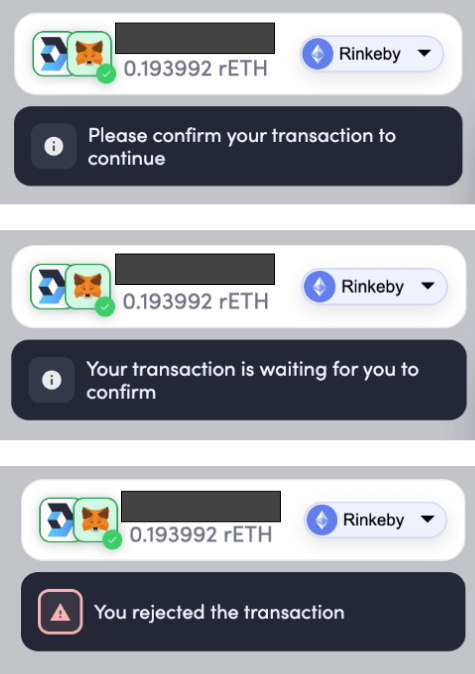
Add pre-flight notifications on your dapp
Finally we will check out the `preflightNotifications` function returned from the `useNotifications()` react hook.
With `preflightNotifications` Ethereum dapp developers can add further quality UX to transaction events!
These pre-flight events include:
- `txRequest` : Alert user there is a transaction request awaiting confirmation by their wallet
- `txAwaitingApproval` : A previous transaction is awaiting confirmation
- `txConfirmReminder` : Reminder to confirm a transaction to continue - configurable with the `txApproveReminderTimeout` property; defaults to 15 seconds
- `nsfFail` : The user has insufficient funds for transaction (requires `gasPrice`, `estimateGas`, `balance`, `txDetails.value`)
- `txError` : General transaction error (requires `sendTransaction`)
- `txSendFail` : The user rejected the transaction (requires `sendTransaction`)
- `txUnderpriced` : The gas price for the transaction is too low (requires `sendTransaction`)
To get these added to your app we need to provide the `preflightNotification` function with a set of properties (`Partial<PreflightNotificationOptions>` for TypeScript developers).
For this we will add one more button to send a transaction but this time we will execute the following code chunk:
const sendTransaction = async () => {
   if (!toAddress) {
     alert('An Ethereum address to send Eth to is required.')
   }
   const balanceValue = Object.values(wallet.accounts[0].balance)[0]

   const signer = provider.getUncheckedSigner()

   const txDetails = {
     to: toAddress,
     value: 1000000000000000
   }

   const sendTransaction = () => {
     return signer.sendTransaction(txDetails).then(tx => tx.hash)
   }

   const gasPrice = () => provider.getGasPrice().then(res => res.toString())

   const estimateGas = () => {
     return provider.estimateGas(txDetails).then(res => res.toString())
   }

   // convert to hook when available
   const transactionHash =
     await preflightNotifications({
       sendTransaction,
       gasPrice,
       estimateGas,
       balance: balanceValue,
       txDetails: txDetails
     })
   console.log(transactionHash)
 }
We can see here that for full preflightNotification coverage we must pass the `sendTransaction`, `gasPrice` and `estimateGas` functions for the notification component to call along with `balance` and `txDetails`.
`preflightNotifications` then returns a transaction hash if all properties are submitted and the transaction is successfully received or the id of the notification if the extra params are not sent.
This will deliver messages like:
All Together Now
With all the above code snippets in place and utilizing all of the `useNotifications()` React Hooks we have an App.js file that looks like this:
import React, { useState, useEffect } from 'react'
import { ethers } from 'ethers'
import {
 useConnectWallet,
 useNotifications,
 useSetChain,
 useWallets,
 init
} from '@web3-onboard/react'
import injectedModule from '@web3-onboard/injected-wallets'
import './App.css'
import blocknativeLogo from './icons/blocknative-logo'
import blocknativeIcon from './icons/blocknative-icon'

const injected = injectedModule()

const infuraKey = 'cea9deb6467748b0b81b920b005c10c1'

const dappId = 'xxxxxx-bf21-42ec-a093-9d37e426xxxx'

const initWeb3Onboard = init({
 wallets: [injected],
 chains: [
   {
     id: '0x1',
     token: 'ETH',
     label: 'Ethereum',
     rpcUrl: 'https://mainnet.infura.io/v3/${infuraKey}'
   },
   {
     id: '0x4',
     token: 'rETH',
     label: 'Rinkeby',
     rpcUrl: 'https://rinkeby.infura.io/v3/${infuraKey}'
   }
 ],
 apiKey: dappId,
 notify: {
   enabled: true,
   position: 'topRight',
   transactionHandler: transaction => {
     console.log({ transaction })
     if (transaction.eventCode === 'txPool') {
       return {
         // autoDismiss set to zero will persist the notification until the user excuses it
         autoDismiss: 0,
         // message: 'Your transaction is pending, click here for more info.',
         // or you could use onClick for when someone clicks on the notification itself
         onClick: () =>
           window.open('https://rinkeby.etherscan.io/tx/${transaction.hash}')
       }
     }
   }
 },
 appMetadata: {
   name: 'Blocknative Web3-Onboard',
   icon: blocknativeIcon,
   logo: blocknativeLogo,
   description: 'Demo app for Web3-Onboard'
 }
})

let provider

const App = () => {
 const [{ wallet, connecting }, connect, disconnect] = useConnectWallet()
 const [{ chains, connectedChain, settingChain }, setChain] = useSetChain()
 const [notifications, customNotification, updateNotify] = useNotifications()
 const connectedWallets = useWallets()

 const [web3Onboard, setWeb3Onboard] = useState(null)

 const [toAddress, setToAddress] = useState('')
 const [notifyPosition, setNotifyPosition] = useState('topRight')

 useEffect(() => {
   setWeb3Onboard(initWeb3Onboard)
 }, [])

 useEffect(() => {
   console.log(notifications)
 }, [notifications])

 useEffect(() => {
   if (!connectedWallets.length || !wallet) return
   console.log(connectedWallets)
   console.log(wallet)
 }, [connectedWallets, wallet])

 useEffect(() => {
   if (!wallet?.provider) {
     provider = null
   } else {
     provider = new ethers.providers.Web3Provider(wallet.provider, 'any')
   }
 }, [wallet])

 const readyToTransact = async () => {
   if (!wallet) {
     const walletSelected = await connect()
     if (!walletSelected) return false
   }
   // prompt user to switch to Rinkeby for test
   await setChain({ chainId: '0x4' })

   return true
 }

 const sendHash = async () => {
   if (!toAddress) {
     alert('An Ethereum address to send Eth to is required.')
     return
   }

   const signer = provider.getUncheckedSigner()

   await signer.sendTransaction({
     to: toAddress,
     value: 1000000000000000
   })
 }

 const sendTransaction = async () => {
   if (!toAddress) {
     alert('An Ethereum address to send Eth to is required.')
   }
   const balanceValue = Object.values(wallet.accounts[0].balance)[0]

   const signer = provider.getUncheckedSigner()

   const txDetails = {
     to: toAddress,
     value: 1000000000000000
   }

   const sendTransaction = () => {
     return signer.sendTransaction(txDetails).then(tx => tx.hash)
   }

   const gasPrice = () => provider.getGasPrice().then(res => res.toString())

   const estimateGas = () => {
     return provider.estimateGas(txDetails).then(res => res.toString())
   }

   // convert to hook when available
   const transactionHash =
     await web3Onboard.state.actions.preflightNotifications({
       sendTransaction,
       gasPrice,
       estimateGas,
       balance: balanceValue,
       txDetails: txDetails
     })
   console.log(transactionHash)
 }

 const renderNotifySettings = () => {
   if (window.innerWidth < 425) {
     return (
       <div className={'conditional-ui-settings'}>
         <h3>Notify Mobile Positioning</h3>
         <button
           className={'bn-demo-button ${
             notifyPosition === 'topRight'
               ? 'selected-toggle-btn'
               : 'unselected-toggle-btn'
           }'}
           onClick={() => {
             setNotifyPosition('topRight')
             updateNotify({ position: 'topRight' })
           }}
         >
           Top
         </button>
         <button
           className={'bn-demo-button ${
             notifyPosition === 'bottomRight'
               ? 'selected-toggle-btn'
               : 'unselected-toggle-btn'
           }'}
           onClick={() => {
             setNotifyPosition('bottomRight')
             updateNotify({ position: 'bottomRight' })
           }}
         >
           Bottom
         </button>
       </div>
     )
   }
   return (
     <div className={'conditional-ui-settings'}>
       {' '}
       <divh3>Notify Positioning</h3>
       <button
         className={'bn-demo-button ${
           notifyPosition === 'topLeft'
             ? 'selected-toggle-btn'
             : 'unselected-toggle-btn'
         }'}
         onClick={() => {
           setNotifyPosition('topLeft')
           updateNotify({ position: 'topLeft' })
         }}
       >
         Top Left
       </button>
       <button
         className={'bn-demo-button ${
           notifyPosition === 'topRight'
             ? 'selected-toggle-btn'
             : 'unselected-toggle-btn'
         }'}
         onClick={() => {
           setNotifyPosition('topRight')
           updateNotify({ position: 'topRight' })
         }}
       >
         Top Right
       </button>
       <button
         className={'bn-demo-button ${
           notifyPosition === 'bottomRight'
             ? 'selected-toggle-btn'
             : 'unselected-toggle-btn'
         }'}
         onClick={() => {
           setNotifyPosition('bottomRight')
           updateNotify({ position: 'bottomRight' })
         }}
       >
         Bottom Right
       </button>
       <button
         className={'bn-demo-button ${
           notifyPosition === 'bottomLeft'
             ? 'selected-toggle-btn'
             : 'unselected-toggle-btn'
         }'}
         onClick={() => {
           setNotifyPosition('bottomLeft')
           updateNotify({ position: 'bottomLeft' })
         }}
       >
         Bottom Left
       </button>
     </div>
   )
 }

 if (!web3Onboard) return <div>Loading...</div>

 return (
    <main>
     <section className="main">
       <div className="main-content">
         <div className="vertical-main-container">
           <div className="container onboard">
             <h2>Onboarding Users with Web3-Onboard</h2>
             <div className="account-center-actions">
               <div>
                 <button
                   className="bn-demo-button"
                   disabled={connecting}
                   onClick={() =>
                     wallet ? disconnect({ label: wallet.label }) : connect()
                   }
                 >
                   {connecting
                     ? 'Connecting'
                     : wallet
                     ? 'Disconnect'
                     : 'Connect'}
                 </button>

                 {wallet && (
                   <button
                     className="bn-demo-button"
                     onClick={() => {
                       connect()
                     }}
                   >
                     Connect Another Wallet
                   </button>
                 )}
               </div>
             </div>
           </div>
           {wallet && (
             <div className="container notify">
               <div
                 style=
               >
                 <div style=>
                   <label>Send 0.001 Rinkeby Eth to:</label>
                   <input
                     type="text"
                     style=
                     value={toAddress}
                     placeholder="address"
                     onChange={e => setToAddress(e.target.value)}
                   />
                 </div>
                 <div className={'send-transaction-container'}>
                   <div className={'send-transaction-container'}>
                     <button
                       className="bn-demo-button"
                       onClick={async () => {
                         const ready = await readyToTransact()
                         if (!ready) return
                         sendHash()
                       }}
                     >
                       Send
                     </button>
                     with in-flight notifications
                   </div>
                   <div className={'send-transaction-container'}>
                     <button
                       className="bn-demo-button"
                       onClick={async () => {
                         const ready = await readyToTransact()
                         if (!ready) return
                         sendTransaction()
                       }}
                     >
                       Send
                     </button>
                     with pre-flight and in-flight notifications
                   </div>
                 </div>
               </div>
               <button
                 className="bn-demo-button"
                 onClick={() => {
                   const { update, dismiss } = customNotification({
                     eventCode: 'dbUpdate',
                     type: 'hint',
                     message: 'Custom hint notification created by the dapp',
                     onClick: () => window.open('https://www.blocknative.com')
                   })
                   // Update your notification example below
                   setTimeout(
                     () =>
                       update({
                         eventCode: 'dbUpdateSuccess',
                         message: 'Hint notification was resolved!',
                         type: 'success',
                         autoDismiss: 6000 // 6 seconds
                       }),
                     4000
                   )
                   setTimeout(
                     () =>
                       // use the dismiss method returned or add
                       // an autoDismiss prop to the notification dismiss(),
                     10000
                   )
                 }}
               >
                 Custom Hint Notification
               </button>
             </div>
           )}
           {wallet && (
             <div className="container ui-settings">
               {renderNotifySettings()}
             </div>
           )}
         </div>
       </div>
     </section>
   </main>
 )
}

export default App
And a final UI product that looks like:
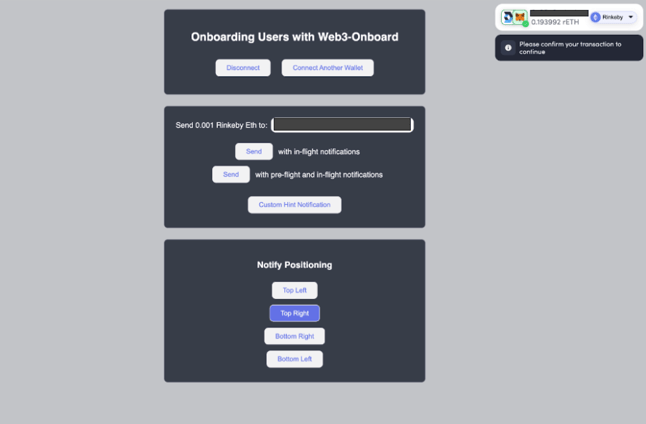
Get started with Web3 Onboard today!
To see our full React hooks library in action, check out our live react demo here or dive right into the code base behind it here.
Developers can leverage Web3 Onboard notifications by signing up for a free Blocknative account today.
With built-in modules for more than 35 unique hardware and software wallets and transaction alerts on leading blockchain networks like Ethereum, Polygon, Gnosis Chain, Optimism, and Arbitrum, Web3 Onboard is the easiest, most effective way for developers to add multi-chain support for top web3 wallets like MetaMask, Ledger, Coinbase Wallet or GameStop.
We encourage all web3 developers to join our Discord community and let us know what new features or libraries you would like to see next to make developing with Web3 Onboard easier!
Helpful Links:
- https://github.com/blocknative/web3-onboard/tree/v2-web3-onboard-develop/packages/react
- https://github.com/blocknative/react-demo
- https://www.npmjs.com/package/@web3-onboard/react
- https://www.npmjs.com/package/@web3-onboard/injected-wallets
- https://onboard.blocknative.com/docs/modules/react
- https://www.blocknative.com/
- https://explorer.blocknative.com/?signup=true
- https://github.com/ethers-io/ethers.js#readme
- https://ethers.org/
- https://ethereum.org/en/
- https://reactjs.org/
- https://infura.io/